Aug 6, 2021 | Birthday, Cards for All Occasions, Classes & Events, Hand Stamped Card, New Products, Stampin' Up!, Stamping Techniques, Thank You, Uncategorized |
Hi Friends,
It’s been way too long since I posted here –so I’m turning over a few hundred leaves in the forests and back in the saddle I am!!!!
OK this card is what I’m featuring the Stampin’ Up! Color & Contour stamp set plus Peaceful Monents for the greeting.
I have to say this was a FUN and EASY card to make!

If you look very closely, you can see vertical and horizontal lines of scoring. I used my Simply Scored Scoring Tool but you could also use the Paper Trimmer. It was EASY!!!
Then I did two step stamping with Highland Heather and Balmy Blue inks and a bit of Pear Pizzazz for background effect.
I did add Shimmery Crystal Effects to the centers of the flowers.
Pear Pizzazz was added for the tiny dots and then I took the Thank You stamp ( from Peaceful Moments) and finished the card !
DONE!
What do you think?
We will be making these cards at my classes next week –Monday night starting at 5PM and Wednesday at 10AM.
I’d love YOU to come ! Let me know!
Please contact me of you have any questions!
I love what we do and I hope YOU DO TOO!!!
Supplies Used:

Apr 10, 2021 | 3D & Paper Crafting Ideas, Birthday, Cards for All Occasions, Hand Stamped Card, Stampin' Up!, Thank You, Uncategorized |
Hi Friends,
This cards is one I copied/tweaked from Demonstrator Jaimie Babarczy.
I LOVE what she did with the template.
My choice of Terracotta Tile card stock and matching ribbon was a favorite!
The base was a layer of Terracotta Tile card stock and I used the floral stamp image ( with the same colored ink) to add interest to the base of the card.
I next took a piece of Soft Suede cards stock ( 3″ x 4 3/4″) and added a piece of Very Vanilla card stock–1/16″ smaller than the Soft Sueded.
Then the fun stamping on the vanilla layer. Simply Terracotta Tile and Soft Sued…that’s it!
My message was using the Thank You from the set–I love the font!!!
Then I cut it out using our Stampin’ Cut & Emboss machine.
Used a few Dimensionals and added it to the lower right hand corner.
I also took a 4″ piece of the matching ribbon and tied one know. Using Glue Dots, I secured it to the edge of the message.
Of course I HAD to add a touch of Wink of Stella to the petals of the flowers–you know me!

Please don’t forget –this bundle is retiring so if this one you MUST have, please either go to my online store or contact me.
Supplies Used:
Jul 16, 2020 | 3D & Paper Crafting Ideas, Birthday, Cards for All Occasions, Hand Stamped Card, New Products, Stampin' Up!, Stamping Techniques, Uncategorized |
 Hi Friends,
Thanks so much for clicking on my link. I hope you enjoy these projects!
This card is a tweaked version of one I saw in Pinterest.

I love how EASY and fast this was to make.
The base is a piece of Night of Navy card stock.
The next layer is a piece of Crushed Curry and THEN I used the new Ornate Floral Embossing folder on the Whisper White layer.
I LOVE how tiny and cute those flowers are –and I think it gives a subtle yet interesting look to the card. What do YOU think?
Next I took the NEW Rectangular Postage punch and Playing With Patterns DSP and cut out two from the paper and two from Night of Navy cards stock.
I also used the NEW Greenery Embossing Folders on the Night of Navy papers.
I attached all layers with the NEW Stampin Seal and the postage cutouts with Dimensionals. I cut out the message with Layering Circles dies and added one of the NEW InColor Enamel dots and voila!
Here’s a simple and easy 3D favor!
l
I used our Clear Tiny cello boxes and simply added the same DSP as in the card. It was fast and easy to do!
I then used a stamp from Parcels & Petals as well as a matching die for the tag. Used a bit of Night of Navy Baker’s Twine and an InColor Enamel dot -and VOILA!
Now I bet you wonder what you can put inside this tiny box!
Well here are a few items I’ve used in the past –OF COURSE chocolate is ALWAYS an option!

Enjoy!
Please click on to see my other friend’s designs! Have fun friends!
- Teri Pocock – https://www.stampinmagic.com/2020/07/stampin-friends-blog-hop-anything-goes.html
- Jean Beaulieu – https://danantmom.blogspot.com/2020/07/july-2020-stampin-friends-blog-hop.html
- Jo Blackman – https://www.joblackman.com/2020/07/sf-2020-blog-hop-anything-goes.html
- Katja Ettig – https://www.kleine-stempelmiez.de/2020/07/16/stampin-friends-blog-hop-anything-goes-2/
- Barbara Lash – https://stampingwithbarbara.com/?p=1550&preview=true YOU ARE HERE!!!!
- Kim Quade – https://kimplayswithpaper.com/home/stampin-friends-perfectly-plaid/
- Kim Lamos- http://www.pinkzebrapapercreations.com/2020/07/stampin-friends-blog-hop-anything-goes.html
- Heidi Collins – https://on-y-go-stamping.weebly.com/home/nothings-better-than-the-stampin-friends-july-blog-hop
- Maureen Rauchfuss – https://crazystampinglady.blogspot.com/2020/07/sf-2020-july-anything-goes-blog-hop.html
- Melissa Thomas- https://seatoseastampin.weebly.com/blog/stampin-friends-anything-goes-blog-hop
- Steph Jandrow – https://stampinandscrappinwithsteph.weebly.com/home/stampin-friends-2020-july-blog-hop
- Barbara Welch – https://creativestampinspot.blogspot.com/2020/07/anything-goes-stampin-friends-blog-hop.html
- Tiziana Milano – http://stampinwtiziana.blogspot.com/2020/07/stampin-friends-july-blog-hop-anything.html
- Anne Marie Hile – http://www.stampinanne.com/2020/07/july-2020-stampin-friends-blog-hop.html
- Lisa Ann Bernard – https://www.queenbcreations.net/2020/06/stampin-friends-blog-hop-2.html
Supplies Used:
OOPS! I forgot to add the NEW Rectangular Postage Stamp Punch!
It’s item #152709
Nov 23, 2018 | Birthday, Cards for All Occasions, Classes & Events, Hand Stamped Card, New Products, Stampin' Up!, Stamping Techniques, Stamping Tips |
Hi Friends,
I just cam back from OnStage in Orlando.
One of the re-visited ideas is to take a look at simpler stamping.
What does THAT mean?
Well, simply, it means to keep your design impressive yet easy..
Here is a card we did at my Monday class.

I LOVE ( I know I’ve said this before, but I do LOVE the Foil -Edged Silver and Gold Paper and envelopes.
They are so easy to use and VERY VERSATILE.
So for this card, I used the Gold Edged Paper and then added a layer of Rich Razzleberry card stock.
Next I cut a piece of the Sweet Soiree DSP ( yes it’s retired but I just had to use it!) and layered it on top.
That paper is gorgeous and it was just enough to give the card some simple elegance.

See how nicely the layer of Rich Razzleberry fits on top of the Gold-Edged card base? Then add the DSP and oh so pretty.
Inside I added a message from the Cake Soiree stamp set –and voila–done deal!
You could use ANY DSP for any occasion. These card and envelope packs are a great deal and fun to use!
What do YOU think?
Now I’m not sure if I’ll be able to control my urges to use more layers and embellishments but every once in a while we’ll do some ‘simple stamping’.
How does that sound to you?
Please let me know your thoughts about simpler, easier stamping.. I aim to please and need YOUR input!
Supplies Used:
Apr 27, 2018 | Birthday, Hand Stamped Card |
Hi Friends,
This is a BEAUTIFUL stamp set and Bundle – ” Cake Soiree”
The stamps are so festive and elegant and very easy to use.
This card uses a base of Whisper White card stock cut to the usual 8 1/2′ x 5 1/4′ and scored at 4 1/4′.
Then a layer of Berry Burst cut to 5 1/4′ x 4 and adhered to the base
Next I took a piece of Marina Mist , cut to 5 x 3/3/4″ and ran it through the Big Shot using the Layered Leaves Dynamic Embossing Folder.
Next is a piece of white card stock cut to 3 x 4 1/2″.
I stamped the cake image with Black Archival Ink then used Old Olive, Berry Burst, Marina Mist and Daffodil Delight Markers with an Aqua Painter. (I love coloring!!!)… and of COURSE some Wink of Stella!
This layer was attached using Dimensionals.
I used SIlver Foil Paper backed with Multipurpose Adhesive Sheets to cut out the cake pedestal and plate with the corresponding framelits.
It’s very easy using those Adhesive sheets on small ( or not so small) images. No mess at all!
All done!
What do you think?

Please feel free to add a comment and be sure to subscribe to my YouTube channel!
Supplies Used:
My Stampin’ Blog showcase goes here
Mar 30, 2018 | Birthday, Cards for All Occasions, Hand Stamped Card, Promotions & Specials |
Hi Friends!
I can’t believe we are at the end of MARCH ALREADY!!!!!
Sale A Bration has three days left!
If you have a Wish list collecting dust, now is the time to hurry and place your order!
If you need help, please contact me.
These cards were made using the gorgeous Springtime Foils Specialty Paper. It’s FREE with any $50 product order!!!!!
If you haven’t had time to check out Pinterest– using THIS GORGEOUS PAPER –you MIGHT want to do so!
So many beautiful and easy samples!
We’ve made a lot in my classes and you can too!
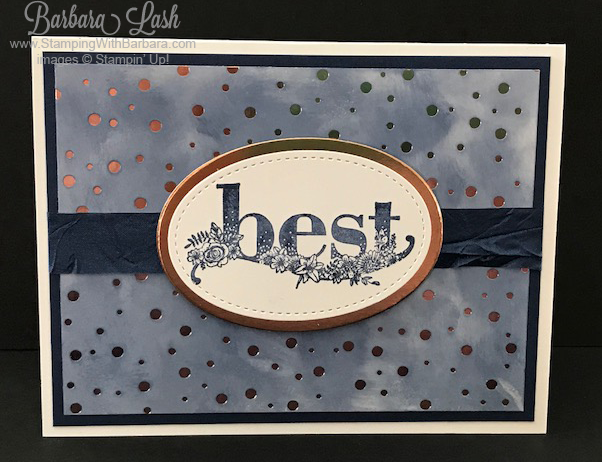
These were made using an hombre of Peek A Boo Peach and Berry Burst inks. The second card uses Night of Navy.
I love how simple and FAST they were to make!
The base is the usual 5 1/2 x 4 1/4 Whisper White. The layer is 5 1/4 x 4.
Then I used the Layering Ovals Framelits to ‘Big Shot’ the images. Popped that layer on with Dimensional ( under a piece of ribbon..just knotted once for an added dimension.
I used some Gold Foil paper to punch out a butterfly and ..voila!
What do YOU think?

With his card, I followed the same dimensions as above but layered the message onto a pic of Copper Foil Paper.
The sentiments come from another fabulous Sale A Bration set. Happy Wishes.
What do you think of this one?
Ok friends –I know it’s Easter week and we all are BUSY! But if you can spare a moment to get your order in, you’ll reap the benefits of a FREE ITEM!
Sale A Bration 2018 ENDS March 31st at 10PM !