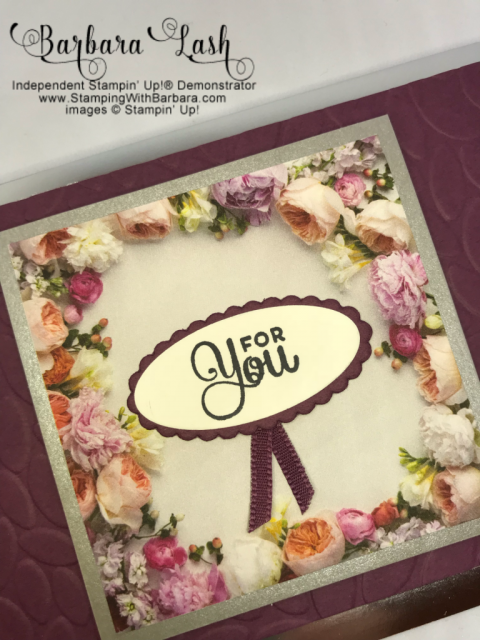
The colors are soft and romantic and really have such versatility!
See how beautiful that paper is! There are 4 sheets with trimmable elements–just like the one I used.
I did emboss the Fresh Fig card stock using the Layered Leaves Folder.
What do you think?
The base was made with Gray Granite at 8 1/2 x 4 1/4–scored at 4 1/4″.
The next layer is Fresh Fig cut at 5 1/4″ x 4″ and embossed.
Then the DSP was cut at 3″ square and layered onto a piece of the Galvanized Metallic paper (cut 3 1/4″ square), using Snail Adhesive.
That layer was attached using Dimensionals
Then the message was stamped and pushed through the Big Shot using layering Ovals.
I did the same with a piece of Fresh Fig to back the white layer.
Lastly I cut a piece of the Fresh Fig Sheer Ribbon and attached to the back of the oval.
I can NOT say enough about how much I LOVE the Foil-Edged Cards and Envelopes! They come in either gold or silver and add such a degree of elegance, in my humble opinion!
They are so easy to use and certainly lend a air of elegance to any card you make!
What do YOU think?
Contact me for questions or you may click on any product below to arrive at my online store!
This is a gorgeous Stampin’ Up! hand made Christmas card.
It’s using the new November promotional stamp set, Snow is Glistening.
Here is the easy and FUN card!
Isn’t it pretty????????
The base is a layer of Merry Merlot..the Joyous Noel DSP is actually the fancy fold.
Don’t worry,…I’ve got a downloadable PDF with all the dimensions and directions later on.
It’s VERY easy and fast to make —seriously!
The message layer is a piece of Merry Merlot with a layer of Very Vanilla and then I stamped the message and a flourish of snow at the top.
The front of the card has another layer of Merry Merlot with Very Vanilla card stock.
This time I stamped the tree in Old Olive, copper embossed three snowflakes and THEN added a swath of Shimmery White Embossing Paste just at tree line.
Looks like snow to me!
I’d love for you to copy this card! Click on any link for product info at my online store or contact me directly!
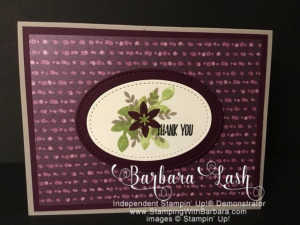
When flipping through our Holiday Catalog, I fell in LOVE with the Thanksgiving card on page 44.
It’s the top left card- using the Merry Merlot card stock.
I think it’s so much fun to COLOR and that;s just what I did!
Using our Watercolor Pencils, it was fun –just like being back in kindergarten!
Then I gently used my Aqua Painter and with soft, one directional strokes, covered over the colored layers.
First I apologize for the poor image –I was in a hurry to get it posted for my Demonstrators–am a work in progress!
Directions:
I used Crumb Cake as the card base at 8 1/2 x 5 1/2, scored at 4 1/2
2.Then I took a piece of Pumpkin pIe at 5 x 3 /3/4 and ran it through the Big Shot using the new Tin Tile Embossing Folder.
3.Then I took a Sponge Dauber and used Pumpkin Pie ink to distress the embossed layer.
4.I did use Tear & Tape to adhere it to the base layer. I think with thicker embossing folders, extra adhesive is a great way to insure it sticks properly.
5.Next I took the wagon stamp and message and used Stazon to stamp on a layer of Very Vanilla.
THEN -for me the REAL FUN began! COLORING!
6.I used the WATERCOLOR PENCILS and colored away.
NO fuss, no worry, just easy broadstrokes over the images–kinda like an ombray effect.
7.THEN I took my Aqua Painter and very gently and in one direction only, blended the colors a tad more.
8.I made a tiny bow with the Braided Linen Thread and attached with a Glue Dot.
9.This layer was attached to a piece of Crumb Cake. The edges were distressed using the blade of my Snips–just to give it a bit more dimension. Dimensionals were used to pop it on top of the textured piece.
These are the products I used to make it:
Contact me with any questions or concerns!
You can click on any product above and it will take you directly to my online store.
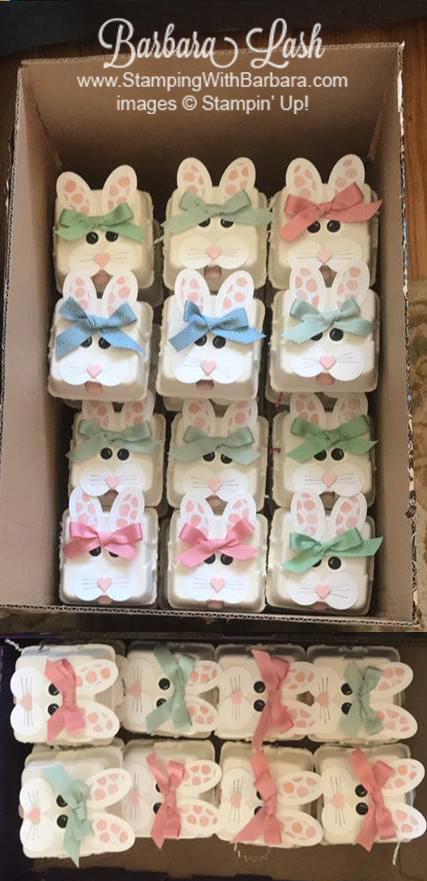
It’s Easter and how adorable is this little egg crate bunny?
TOO DARN CUTE
Had an incredibly FUN TIME three days ago with my ‘peeps’ –how appropriate -PEEPS!
We made 40 Easter Egg Baskets for the kids at the Charlestown and Springfield Ronald McDonald Houses..
The “bunnies” were very busy!!!
All delivered and they will ‘pop’ up at the Houses on Sunday. I think the kids will love them!
Of course I had to make some for my grand-kids. They are so cute and make me smile.
SO…….. I wish each of you a Happy Easter and lovely SPRING!!
As I look outside, I can envision the garden being planted, the lawn waking up and MY POOL OPENED!!!
So much to enjoy come spring…
Enjoy the day..
Enjoy the season!
Hope to see YOU soon!
We used the retired Egg Crates from last year plus some retired ribbons. Of course the body of the work was done simply with punches and adhered with Tombow glue. You can’t see the tail–but IT IS CUTE!…. a big fluffy cotton ball! We added Cadbury Eggs (4 fit perfectly in the egg holes) and voila!
The content in this blog is the sole responsibility of Barbara Lash as an Independent Stampin’ Up! Demonstrator. The use of and content of classes, services or products offered is not endorsed by Stampin’ Up!