Aug 6, 2021 | Birthday, Cards for All Occasions, Classes & Events, Hand Stamped Card, New Products, Stampin' Up!, Stamping Techniques, Thank You, Uncategorized |
Hi Friends,
It’s been way too long since I posted here –so I’m turning over a few hundred leaves in the forests and back in the saddle I am!!!!
OK this card is what I’m featuring the Stampin’ Up! Color & Contour stamp set plus Peaceful Monents for the greeting.
I have to say this was a FUN and EASY card to make!

If you look very closely, you can see vertical and horizontal lines of scoring. I used my Simply Scored Scoring Tool but you could also use the Paper Trimmer. It was EASY!!!
Then I did two step stamping with Highland Heather and Balmy Blue inks and a bit of Pear Pizzazz for background effect.
I did add Shimmery Crystal Effects to the centers of the flowers.
Pear Pizzazz was added for the tiny dots and then I took the Thank You stamp ( from Peaceful Moments) and finished the card !
DONE!
What do you think?
We will be making these cards at my classes next week –Monday night starting at 5PM and Wednesday at 10AM.
I’d love YOU to come ! Let me know!
Please contact me of you have any questions!
I love what we do and I hope YOU DO TOO!!!
Supplies Used:

Apr 26, 2019 | 3D & Paper Crafting Ideas, Cards for All Occasions, Classes & Events, New Products, Stampin' Up!, Thank You |
Hi Friends,
Incredible Like You is a stamp set I learned to LOVE!
When I first saw the Project Kit, I knew I had to do a class –simply because those cards are so BEAUTIFUL!
But then I started seeing how other Demonstrators created different images and I was HOOKED!
Here is one I love love love!
It was created by Demonstrator, Lori Pinto. I did tweaked mine just a bit but the inspiration came from Lori’s beautiful card.

Incredible Like You
It can be used for most occasions and my intention is for a special friend—just a note…
I used Pear Pizzazz, Highland Heather and Whisper White cards stock and matching inks.
Of course had to use Wink of Stella to add just a pop of shine to the flowers. Two little Enamel Dots and voila!
The fonts in the messages are whimsical and “happy.” ( Have I told you I am enamored with artists who design fonts? Taking a pen and coming up with twists and depth to create letters and numbers fascinate me!)
What do you think?
This stamp set is available from the Occasions catalog until June 3rd.
It is NOT carrying over to the new Annual catalog, so if you want it , please order NOW
Supplies Used:

Apr 24, 2019 | Cards for All Occasions, Classes & Events, Hand Stamped Card, Promotions & Specials, Stampin' Up!, Thank You, Uncategorized |
Hi Friends,
Both the Petal Palette stamp set and Berry Burst In Color are retiring ( by June 3rd or until supplies last)
So I decided to create a card using this stamp set (one of my all time favorites!) —and Berry Burst ink!

This is incredibly easy to make!
I stamped the leave with Lemon-Lime Twist ink ( another retiring In Color) and the flowers with berry Burst.
Next I stamped three flowers on scrap paper then using the Big Shot, I cut them out ( Petals & More Thinlits–also retiring)
Popped them up with Dimensionals and of course I HAD to ‘bathe’ them with Wink of Stella!
And for just a bit of extra excitement, I put a Perl in the center of the popped up flowers.
What do YOU think?
Of course no card leaving my house has a naked envelope–so a bit more stamping and voila!
All done! Can’t you imagine this card for almost any occasion?
So friends, this set and Thinlits are retiring as are all the 2017-2019 In Colors.
Get yours before they are gone!
Contact me or go to my online store and place your order.
Supplies Used:

Dec 3, 2018 | 3D & Paper Crafting Ideas, Cards for All Occasions, Classes & Events, Hand Stamped Card, New Products, Stampin' Up!, Stamping Techniques, Stamping Tips, Thank You |
Hi Friends,
Today I want to show you how easy a few card techniques can be used to make a very pretty Stampin’ Up! card!

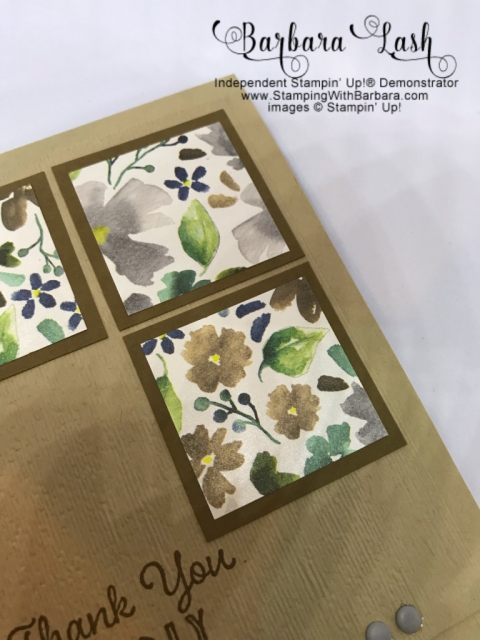
First I took a piece of Crumb Cake card stock as my base.
Next I took a piece of Crumb Cake ( 1/4′ smaller by length and width of the base) and stamped, in Early Expresso ink, the words “Thank You Kindly” from the Hanging Garden stamp set.
NEXT –magic with the Subtles Embossing Folder!I ( one of MY NEW FAVORITES!)
Take a look at the ‘subtle’ yet textured look of that layer.

Can you see the fine lines? Makes me think of fine wale corduroy.
Next I took a piece of Soft Suede card stock and used the Layering Squares Framelits, with my Big Shot, cut 3 squares.
Then I took a piece of the Frosted Floral DSP ( LOVE the colors and the fine shimmer!!!) and made 3 smaller squares.
Of course I used Snail to adhere all 3 pieces of DSP to the card stock.
Then I arranged the squares on the embossed layer.
To add just a bit of interest, I used 3 enamel shapes in the lower right hand corner.
There you have it…3 easy techniques:
1. Using the Subtles Embossing Folder
2. Using the Layering Squares Framelits
3. Adding a few embellishments.
Three simple ways to make a card –make it YOUR own and send it with love!
You could make a boxed set of these for a gift!
What do you think?
Contact me for any help or click on any product below and you can shop in my online store!
Supplies Used:

Nov 26, 2018 | 3D & Paper Crafting Ideas, Christmas Cards, Classes & Events, New Products, Stampin' Up!, Stamping Techniques, Stamping Tips |
Hi Friends,
The elves are surely BUSY!
What fun we had last Monday making a few Christmas tags.

Talk about easy, fast and FUN!
We used the Stampin’ Up! stamp set, Signs of Santa.
The elves are adorable so after we stamped them with Staz-ON ink, we colored them using the Many Marvelous Markers.
Cute cute CUTE!
Of course I had to use Wink of Stella for a bit of pop!
The base of the tag was a piece of Poppy Parade and Garden Green cards stock. I cut them to 4″ x 2″.
To make the cut out for the ribbon, I used the Scalloped Tag Topper punch.
Then I used the Tags & Tidings stamp set with the Christmas Tag Thinlits. This allowed me to have a LOT of options for the little tag at the top.

There are 16 images on that stamp. I inked it up with Memento ink -then cut them out with the matching Christmas Tag Thinlit.
It was EASY and fast!
A little piece of the Santa’s Workshop Specialty DSP layerd on top of the card stock…. then popped the little elf ( and Mrs. Claus) on with a Dimensional.
Next I used a few Red Rhinestone Jewels to give a bit of sparkle…
About 12″ of Garden Green and White Baker’s Twine to use as ties and voila!
I just think they are adorable and certainly will add a bit of festive pizzazz to any package!
What do YOU think?
We’ll be making more cute tags as the days approach!
Would love to have YOU come to one of my classes!
Supplies Used:

Nov 23, 2018 | Birthday, Cards for All Occasions, Classes & Events, Hand Stamped Card, New Products, Stampin' Up!, Stamping Techniques, Stamping Tips |
Hi Friends,
I just cam back from OnStage in Orlando.
One of the re-visited ideas is to take a look at simpler stamping.
What does THAT mean?
Well, simply, it means to keep your design impressive yet easy..
Here is a card we did at my Monday class.

I LOVE ( I know I’ve said this before, but I do LOVE the Foil -Edged Silver and Gold Paper and envelopes.
They are so easy to use and VERY VERSATILE.
So for this card, I used the Gold Edged Paper and then added a layer of Rich Razzleberry card stock.
Next I cut a piece of the Sweet Soiree DSP ( yes it’s retired but I just had to use it!) and layered it on top.
That paper is gorgeous and it was just enough to give the card some simple elegance.

See how nicely the layer of Rich Razzleberry fits on top of the Gold-Edged card base? Then add the DSP and oh so pretty.
Inside I added a message from the Cake Soiree stamp set –and voila–done deal!
You could use ANY DSP for any occasion. These card and envelope packs are a great deal and fun to use!
What do YOU think?
Now I’m not sure if I’ll be able to control my urges to use more layers and embellishments but every once in a while we’ll do some ‘simple stamping’.
How does that sound to you?
Please let me know your thoughts about simpler, easier stamping.. I aim to please and need YOUR input!
Supplies Used:


