Apr 22, 2019 | 3D & Paper Crafting Ideas, Promotions & Specials, Stampin' Up!, Stampin' Up! Events, Uncategorized |
Hi Friends,
Can you believe it is time for a NEW Stampin’ Up! catalog?
I can hardly believe a year has almost passed and we are on the cusp of retiring products and supplies—only to WELCOME a brand new catalog filled with new stamp sets and products!
So friends, take a look at this list.
There are many items retiring. Please know that new stamps will be either photopolymer or red rubber.
The red rubber with have the NEW CLING layer.
This new adhesive holds the stamps PERFECTLY to the acrylic block!!
Here is the list of items we will be saying ‘good bye’ to–VERY SOON!
SO if any of these are on your list of must-haves, please order now!
Retirement List 2019
All of the 2017-2019 InColors are also retiring!

Once they are gone, they too are GONE!
This means all the cardstock, ink pads, ribbons, refills and markers!
Please let me know if I can help you!
Contact me or go to my on line store
Supplies Used:

Mar 4, 2019 | 3D & Paper Crafting Ideas, Cards for All Occasions, Hand Stamped Card, New Products, Promotions & Specials, Stampin' Up!, Stamping Techniques |
Hi Friends,
One of the Sale A Bration items is this beautiful stamp set, Lasting Lily!

There are so many beautiful cards and projects you can create/copy with this elegant stamp set.
You can earn this beautiful stamp set with a qualifying Sale A Bration order. Be
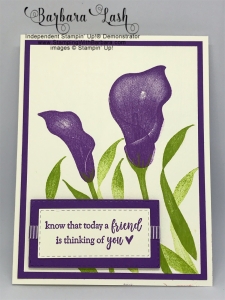
Take a look at this card I recently made for a friend.

I used Gorgeous Grape card stock as well as the 1/4″ matching ribbon Plus the NEW Rectangle Stitched Framelits !!!!!!
I added a few Dimensionals to pop up the message (another Sale A Bration free stamp set -Part of My Story-pg 14) and voila–DONE!
This set is simply lovely and can be used for many occasions.
I just sent out a few Sympathy cards using this with Blushing Bride and Soft Sea Foam card stock… elegant and very appropriate.
Don’t forget –Sale A Bration is a great time to add to your collection of Stampin’ Up! items!


Purchase a little …get rewarded with FREE SaleA Bration items!
Purchase a little more–get a LOT of Sale A Bration items!!!
WANT A LOT ON TOP OF A LOT?
The BEST deal is to become a stamper on my team!
You get all the benefits just as I do but you do NOT have to do as I do!
Yup!
It’s that easy!
SO contact me for more info!
Supplies Used:

Dec 3, 2018 | 3D & Paper Crafting Ideas, Cards for All Occasions, Classes & Events, Hand Stamped Card, New Products, Stampin' Up!, Stamping Techniques, Stamping Tips, Thank You |
Hi Friends,
Today I want to show you how easy a few card techniques can be used to make a very pretty Stampin’ Up! card!

First I took a piece of Crumb Cake card stock as my base.
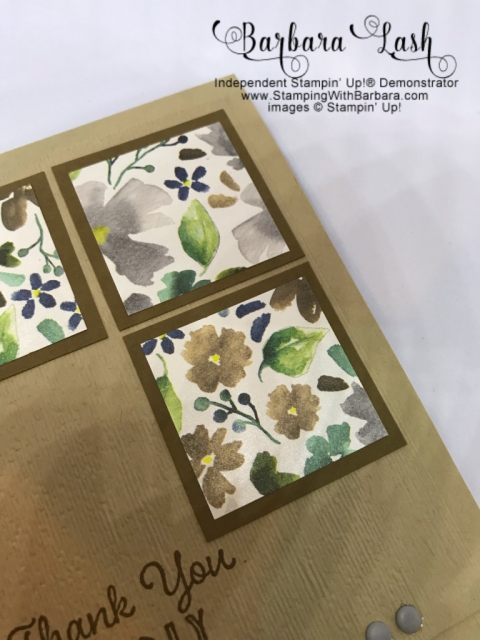
Next I took a piece of Crumb Cake ( 1/4′ smaller by length and width of the base) and stamped, in Early Expresso ink, the words “Thank You Kindly” from the Hanging Garden stamp set.
NEXT –magic with the Subtles Embossing Folder!I ( one of MY NEW FAVORITES!)
Take a look at the ‘subtle’ yet textured look of that layer.

Can you see the fine lines? Makes me think of fine wale corduroy.
Next I took a piece of Soft Suede card stock and used the Layering Squares Framelits, with my Big Shot, cut 3 squares.
Then I took a piece of the Frosted Floral DSP ( LOVE the colors and the fine shimmer!!!) and made 3 smaller squares.
Of course I used Snail to adhere all 3 pieces of DSP to the card stock.
Then I arranged the squares on the embossed layer.
To add just a bit of interest, I used 3 enamel shapes in the lower right hand corner.
There you have it…3 easy techniques:
1. Using the Subtles Embossing Folder
2. Using the Layering Squares Framelits
3. Adding a few embellishments.
Three simple ways to make a card –make it YOUR own and send it with love!
You could make a boxed set of these for a gift!
What do you think?
Contact me for any help or click on any product below and you can shop in my online store!
Supplies Used:

Nov 26, 2018 | 3D & Paper Crafting Ideas, Christmas Cards, Classes & Events, New Products, Stampin' Up!, Stamping Techniques, Stamping Tips |
Hi Friends,
The elves are surely BUSY!
What fun we had last Monday making a few Christmas tags.

Talk about easy, fast and FUN!
We used the Stampin’ Up! stamp set, Signs of Santa.
The elves are adorable so after we stamped them with Staz-ON ink, we colored them using the Many Marvelous Markers.
Cute cute CUTE!
Of course I had to use Wink of Stella for a bit of pop!
The base of the tag was a piece of Poppy Parade and Garden Green cards stock. I cut them to 4″ x 2″.
To make the cut out for the ribbon, I used the Scalloped Tag Topper punch.
Then I used the Tags & Tidings stamp set with the Christmas Tag Thinlits. This allowed me to have a LOT of options for the little tag at the top.

There are 16 images on that stamp. I inked it up with Memento ink -then cut them out with the matching Christmas Tag Thinlit.
It was EASY and fast!
A little piece of the Santa’s Workshop Specialty DSP layerd on top of the card stock…. then popped the little elf ( and Mrs. Claus) on with a Dimensional.
Next I used a few Red Rhinestone Jewels to give a bit of sparkle…
About 12″ of Garden Green and White Baker’s Twine to use as ties and voila!
I just think they are adorable and certainly will add a bit of festive pizzazz to any package!
What do YOU think?
We’ll be making more cute tags as the days approach!
Would love to have YOU come to one of my classes!
Supplies Used:

Nov 23, 2018 | Birthday, Cards for All Occasions, Classes & Events, Hand Stamped Card, New Products, Stampin' Up!, Stamping Techniques, Stamping Tips |
Hi Friends,
I just cam back from OnStage in Orlando.
One of the re-visited ideas is to take a look at simpler stamping.
What does THAT mean?
Well, simply, it means to keep your design impressive yet easy..
Here is a card we did at my Monday class.

I LOVE ( I know I’ve said this before, but I do LOVE the Foil -Edged Silver and Gold Paper and envelopes.
They are so easy to use and VERY VERSATILE.
So for this card, I used the Gold Edged Paper and then added a layer of Rich Razzleberry card stock.
Next I cut a piece of the Sweet Soiree DSP ( yes it’s retired but I just had to use it!) and layered it on top.
That paper is gorgeous and it was just enough to give the card some simple elegance.

See how nicely the layer of Rich Razzleberry fits on top of the Gold-Edged card base? Then add the DSP and oh so pretty.
Inside I added a message from the Cake Soiree stamp set –and voila–done deal!
You could use ANY DSP for any occasion. These card and envelope packs are a great deal and fun to use!
What do YOU think?
Now I’m not sure if I’ll be able to control my urges to use more layers and embellishments but every once in a while we’ll do some ‘simple stamping’.
How does that sound to you?
Please let me know your thoughts about simpler, easier stamping.. I aim to please and need YOUR input!
Supplies Used:

Nov 21, 2018 | 3D & Paper Crafting Ideas, New Products, Stampin' Up!, Stamping Tips |
Hi Friends,
Sweet lavender and the Stampin’ Up! stamp set Bubbles & Bubbly have a symbiotic relationship! — in my humble opinion……..
When I saw this adorable stamp set, I KNEW I’d be using it to create lots of gifts.

I first took a piece of Whisper White cards stock and ran it through the Big Shot using the Subtles Embossing Folder. (LOVE THIS FOLDER!)
Next I took Pool Party ink and used my Aqua Painter to brush on the splash background. Random and in one direction is the key here. That piece was layered onto Pool Party and then Highland Heather card stock.
On a separate piece of paper, I stamped (with Staz-On) the tub image and the ducky on the towel.
The Stampin’ Blends were used to color the parts of those images. AND I LOVE TO COLOR!!!! I also stamped ‘Pamper Yourself’ on a smaller piece of Whisper White card stock and put lots of bubbles in Pool Party! My Bone Folder ruffled up the ends of the paper just enough to give a bit of texture.
After I finished coloring, I fussy cut the tub and ducky out–easy-peasey! Popped a few Dimensionals on and placed them onto the Pool Party layer.
Baker’s Boxes are so versatile and I choose to use them. Of course I had to add some color so I filled a Stampin’ Spritzer with Pool Party refill ink. Spritz here and there and the Baker’s Box has some flair!

Tear & Tape was needed to attach the Highland Heather layer to the top of the box. Lastly of COURSE I had to add shine!
A bit of resurrected Crystal Effects on the tub gave it just enough contrast. Wink of Stella completed the necessary finishing touches…voila!
NOW INSIDE the box are four Shower Frizzies! I made them all by myself with a bit of help from Mrs. Google! LOL! They smell so nice and really work well. Simply place one Shower Fizzy on the floor in your tub and the shower water will cause the fragrance to waft all around! RELAXING!!!!
This makes a great gift for your women friends!
What do YOU think?
Supplies Used:
Want to make some for your friends?
Need help? Or you can click on any product above to be connected to my OnLine Store!


